One way to immortalize a live concert or event is by making an audio recording of it. And to get the best results on your recording, you need to get the audio feed straight from the mixer.
There are several ways you can use to record live music from an audio mixer, but the four best, proven methods are:
Whether you are looking to record the audio at a live concert, an important event, or get high-quality demos for your band, in this post, we go into more detail to show you the best four methods you can use. Keep reading to learn more!
A portable audio recorder is a practical option to record audio at a live event. You only need the recorder and a handful of cables and connectors to make the connection. Plus, it is very easy to set it up, and the recorded audio quality is excellent.
With an audio recorder, you have two options when it comes to recording at a live event:
You can get good live audio recordings without connecting the recorder to a mixing board, using either the built-in or attachable external microphone.
The resulting sound would be ok because the built-in microphones are usually very sensitive condenser mics, thus delivering excellent sound.
The only problem with using open to air microphones is that they also pick up all the ambient noise, and the recorded sound won’t be as detailed as if the signal was coming straight from the audio mixer. This is especially true if you are farther away from the sound source.
You also lose the ability to control your mix at this point, unfortunately, so you’re missing out on an opportunity if you’re not using the mixer’s outputs.
If you choose to go with this method, you have to point the microphones towards the main stage and get as close as possible to get the best chance of picking up the performance in more detail.
Most professional audio recorders allow you to install different interchangeable microphone capsules with different configurations that snap into place.
You can also use any external mic you’d like because professional recorders also have input channels with phantom power to connect the microphone of your choice.
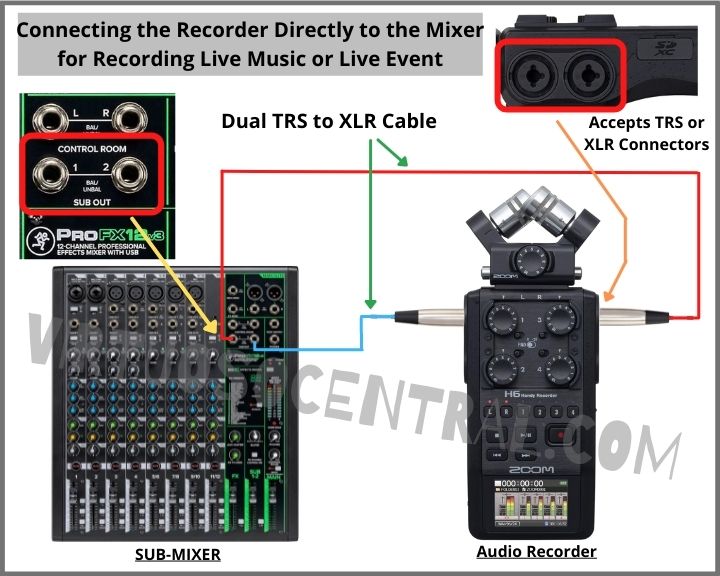
To get the best audio quality when using a portable recorder to record a live concert or event, you need to connect it straight to the mixer to get a clean audio signal.
To achieve this, you need to get a mono or stereo signal from the main mixing console.
When deciding which output to use on the mixer, I would highly recommend talking to the sound technician so that he can tell you what is available.
It is also important to ensure that the audio recorder you use accepts 1/4″ TRS or XLR inputs. Most professional recorders accept both.
There are several ways you can get an audio feed from the main mixing board, but it will all depend on availability and whether you want a mono or stereo signal.
If you want a mono signal, meaning a single channel, you can use the output labeled “AUX SENDS,” “MON,” “CTRL ROOM,” or “CR OUT.” Depending on the brand you use, they could be labeled differently, but they do exactly the same.
After locating the output you want to use, you have to run a cable from the output you chose to the recorder. Usually, it will be a TRS or XLR connector.
Then you need to increase the volume on the mixer until you see a level on the recorder’s screen.
If you choose to use the aux send as your mono output channel, don’t forget that you need to increase the volume on each channel you wish to record. In other words, each channel will have an “AUX” knob that you have to increase to include it in the recording.
This is not the best way to get audio from a mixer to record it, but sometimes it’s the only available option depending on the mixer and size of the event.
The way I recommend to get audio from the mixer to record it is to use a stereo “SUBGROUP,” also labeled “SUB,” or “STE” depending on the brand. Here’s how:
To learn all about Subgroups, click the link.
You could also use the “MAIN OUTPUT” or “STEREO OUT” from a line-level mixer to connect it to the audio recorder. But this only works if you don’t intend to connect powered speakers or amplifiers to the mixer.
If the mixer is being used for the event, chances are you won’t be able to use the line-level main output for recording.
Note: If you are using a powered mixer, NEVER connect the recorder or any other device to the main output. This output is not line-level; it is used to connect Loudspeakers. If you connect your recorder to this output, it will be damaged.
Another way to get an audio feed from a mixer for recording is using a pair of RCA connectors labeled “REC OUT,” “TAPE OUT,” or just “OUT.” This output was initially intended to record to tape cassettes or tape reel recorders.
Although this connection is intended for recording, I don’t recommend it that much because this output is not balanced, meaning that the connectors and cables are not shielded. A balanced connection uses shielded twisted-pair cable and three-conductor connectors specially designed to be immune to line noise.
If you decide to use the “REC OUT” connector anyways, you’ll still get a decent quality audio signal, but you might find some noise in the line if you run it over long distances.
These concepts might be difficult to understand if you are new to sound engineering. If this is the case, don’t worry, I have written an article explaining all of these concepts in an easy-to-understand way. If interested, click the link to learn about mixing console basics.
You no longer have to be a professional artist or field recordist to have a powerful, detailed portable audio recorder. There’s a ton of excellent field recorders available at consumer prices. Here are a few suggestions of some of the best portable audio recorders available in the market.
Considering how powerful and portable today’s electronics are, you don’t even need a laptop to record live audio from a mixer. You can even make a good recording using just a smartphone and a few accessories. You’ll need to prepare accordingly, however.
Most of the considerations for recording from a mixer to a smartphone are similar to what you’ll encounter when recording to a laptop. You’ll need a way to get audio into your phone. You’ll also need some app to record the audio.
As far as getting a signal into your phone, there are several ways to do so. Here are the best six methods:
I won’t go into detail on how to use these six methods because I have already written an article explaining this process with step-by-step instructions and connection diagrams. To check the article, click here.
The only caveat is that the article was intended for iPhone users, but the same procedure also applies to Android users. The only difference is that instead of using Apple’s camera adapter to make the connection (Lighting to USB-A adapter), you need to get the correct adapter to go from USB-A to USB-C or micro USB, depending on the Android phone you have.
If you’re going to be recording on an Android, you’ll need to install some third-party app for recording. Bandlab is both a multitrack recorder for Android devices and social media network for musicians. If you’re doing live audio recording to help build a band or musician’s reputation, Bandlab is a useful tool to have in your pocket.
If you’re recording with an iPhone, it should come with a copy of GarageBand included. No additional apps will be necessary.
Recording apps are often set up similarly to GarageBand, so if you’re familiar with that software, you should be good to go. You’ll open the software and create a new track. You’ll be given the option for what kind of signal you’re working with.
It won’t make much of a difference which option you choose, though, as you’re consolidating everything down to a mono or stereo input. The Guitar or Instrument option should suffice.
Once everything is set up, check and make sure there’s a signal via the meter. If you’ve got a signal, you just need to press the big red record button, and you’re ready to go!

One of the best ways to record live music from a mixer is by using a computer. As nearly everybody’s got a laptop at their disposal, this could be the most practical method.
Most of us have powerful, high-quality recording software at our disposal as well. This means you’ll get clear, detailed recordings using this method. You’ll also have far more control over those recordings once they’re in the software.
This raises the question about live audio recording – how will you get the audio from the mixer into your laptop?
Here are the best three methods to record a live event using a laptop:
I will not explain each method in detail because I have already covered how to record audio from a mixer to a computer step by step in another article. Click the link to check it out.
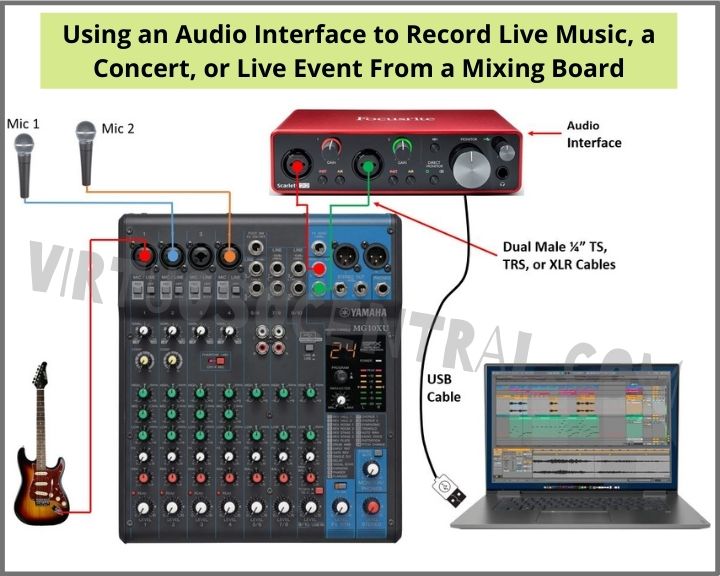
A USB audio interface is recommended if you’re recording live concert audio.
Luckily, there’s some powerful audio software out there for next to nothing. And usually, when you buy an interface, it comes bundled with a DAW (Digital Audio Workstation) software that you can use for recording.
If you’re recording on a budget, there are even excellent free options like Audacity. It’s a bit rough, but it will get the job done.
When picking out a USB audio interface, you should think about how many simultaneous channels you want to record to get the correct one.
You would also need to know what sort of conditions you’ll be in. Will you be looking to record a live band from a professional venue’s mixing desk? Or will you be in more makeshift environments like coffee shops, basements, garages, and living rooms?
This answer will determine what kind of power source you should get for your audio interface. You can get audio interfaces that are powered solely by USB. They tend to have fewer inputs and cost more than the alternative.
If finding an outlet isn’t going to be a problem, you can get all sorts of excellent audio interfaces for not a lot of money. Here are a few suggestions you can take into consideration.
This might seem like a subtle decision, but it’s one that will have an enormous impact on your recording. This approach will mostly factor in if you’re recording from your mixer’s AUX outs, where this will be an option.
A post-fader mix means you’re recording everything exactly as it’s coming out of the board. If you have to turn down a guitarist’s cab mic during a particularly intense section, for instance, that will be reflected in the final recording.
On the other hand, a pre-fader mix records audio before it reaches the main mixer outs. This approach also gives you some excellent additional options for even more detailed recordings.
A pre-fader mix lets you record audio from a dedicated pair of room mics from the mixer board, without running the risk of a feedback loop, for instance. You could set up ambient mics on-stage, as well, if there’s room from the monitoring board.
This also solves one of the dilemmas you may encounter if you’re going to record audio at a live event. Not everything gets a microphone. If it’s not going through a microphone, it’s not going to get picked up by the board.
This means it wouldn’t show up in a live recording straight from the AUX out.
Modern recording equipment and software offer some truly unprecedented options. Given how powerful and versatile modern recording tools are, your imagination’s the limit.
If you’re using a multi-channel audio interface, you could record direct-outs of individual channels as well using channel inserts. This means you can create a track for as many signals as you want, which you can then mix and master like you would a studio recording.
If your mixer comes with “Inserts” for each channel, you could use a multi-channel interface to connect each separate channel from the mixer to the respective channel on the interface.
Then you would create a recording where each track is separate. That way, you could edit each track independently then mix it on the DAW of your choice.
One of our most crucial recording audio tips is to play through the gig in your mind beforehand. This will help you decide the most important details, like which instruments you’re hoping to record and at what volume.
You could even create a template before you get there, so you’ll be prepared and ready to go!
If you’re working with a digital mixer, you’ll want to look at its instruction manual if that’s available to you. Different mixers route audio differently, and you’ll need to know those specifics if you’re looking to make a multitrack recording.
Many modern digital mixing boards have native recording capabilities. It’s also common to record straight to a USB drive. Some can even record multitrack files, which can be mixed, mastered, and polished after the fact.
If a digital mixer is going to be used for the event, you could just connect a large enough USB drive and set things up so that the mixer records each channel separately to give the option of mixing and mastering the raw recording on a DAW later on.
It’s unbelievably easy, efficient, lightweight, and portable. Such powerful technology is readily available these days. Make the most of it!
When recording audio at a live event, you need to be ready for anything. So while you may plan on preferring one approach mentioned above over another, you should really have options for all of them in case something goes wrong.
You can always get another take in a studio setting if something goes wrong. With live audio, you got only one shot; once the moment’s gone, it’s gone forever.
This means if you have the option, you should bring along a laptop and all of the cables you’d need to record live audio. You should also make sure to have whatever adapters you might need, as things tend to go wrong when the moment strikes.
You may even want to bring along a field recorder if that’s available to you at all. While it’s no alternative to getting a clean signal straight from the board, it’s better than nothing. It can serve as a backup if every other failsafe fails.
Whatever you’re planning on doing with sound engineering, you should know how to record live audio from a mixer. Everyone from established bands to emerging artists to public speakers may need your services, and it pays to be ready!
I’ve gathered a ton of knowledge in my years working with audio equipment that I like to share on my blog, from recording live music to getting the perfect mix. Check out my blog to learn more about these subjects.
If you have questions, get in touch and let me know!